Auto ISO and bird photography
with the OM System OM-1
Like all high-end Micro 4/3 cameras previously made by Olympus, the OM System OM-1 packs a lot of
functionality in its deceptively small body. For my general impressions on the OM-1 and a comparison with
the Olympus E-M1 Mark II, which the last of the Olympus cameras I used, see
here.
The Olympus E-M1X was the first, and last, Olympus camera equipped with
Subject Tracking with a Birds setting, and the OM-1 significantly
improves on this functionality with the Subject Detection setting.
The photography of birds in flight with the OM-1 requires a specialized configuration of the camera
settings, in part because of the characteristics of this type of photography, and in part to take maximum
advantage of the specific capabilities of this camera.
Lenses for bird
photography
I almost always use the Olympus 300 mm f/4 hand-held, if necessary with the
MC-14 or MC-20 teleconverter. The price tag of
these three optics is relatively high, but the 300 mm is exceptionally sharp, and is IP53 weather proof.
Using these optics means that you must be prepared to swap the teleconverters in and out in the field,
which takes time and risks exposing the camera interior to the elements.
If you are not put off by the roughly double weight of the
Olympus ED 150–400 mm f/4.5 TC1.25x IS PRO
and its threefold price tag compared to the 300 mm, by all means choose the 150-400 mm. It is certainly
the best Olympus/OM System lens for the job, and reaches a 500 mm focal length with a flip of the lever
that controls its internal 1.25x teleconverter. If the price and/or weight are too high for you, and the
300 mm plus teleconverters are enough for your subjects, you may prefer the latter.
There is also a far more affordable
M.Zuiko ED 100-400 mm f/5.0-6.3 IS, which you may consider if the price of the 300 mm also gives you pause. It is not a Pro lens, is only
IPX1 weather proof, its front extends a lot when zooming, and is optically not as good as the 300 mm. I do
not recommend its use with a teleconverter, but it is still a reasonably good lens.
There is now also the OM System 150-600 f/5-6.3, which at the time of
writing (July 2024) is the longest telephoto lens ever made for Micro 4/3. It is not a Pro lens and only
IPX1 weather proof, but on the other hand it is usually cheaper than the 300 mm Pro. I did not try it yet
on birds in flight, because of its weight (over 2 Kg). Besides, I strongly doubt I would be able to use it
with this type of subject beyond a focal length of 400 mm or so. It is otherwise very good for static or
swimming birds, although not as sharp as the 300 mm Pro (especially at the 600 mm end). Therefore, it
tolerates a lesser amount of cropping in post-processing, but the photographer can make up for this by
zooming to a closer subject crop in the field. The 300 mm Pro, optionally with MC-14 teleconverter, weighs
roughly half, and is a better choice for birds in flight than the 150-600.
The
M.Zuiko ED 40-150 mm f/2.8 PRO
is a good lens, but not on par with the 300 mm, and with a teleconverter it does show its limits. Its
unaided focal length range is too short to be really useful in bird photography, except when you can get
really close to the subject.
If I should need a 150 mm for birds in flight, I would rather use the
40-150 mm f/4 Pro, which is far easier to hand-hold and optically as good
as, or possibly better than, its 40-150 mm f/2.8 counterpart. The f/4 lens cannot use teleconverters.
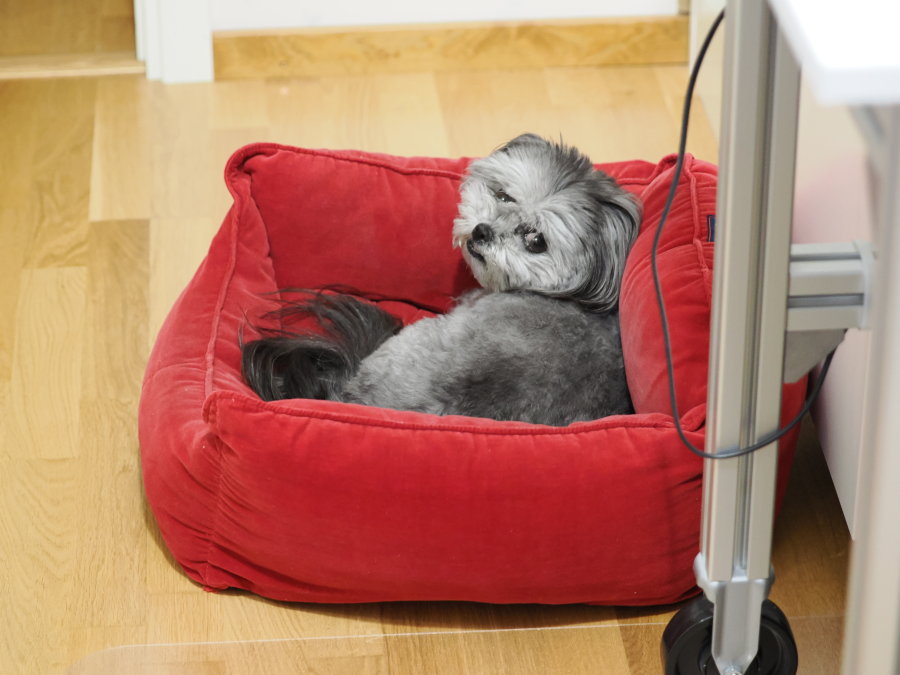
Stella with Olympus 4/3 50-200mm at f/2.8 and 50 mm, OM-1 with Subject Detection in Bird mode, ISO
4,000, 1/15 s.
The OM-1 immediately recognized the subject (despite it not being a bird) and locked on its closest eye,
but a few hand-held shots were required before getting an acceptable sharpness.
On the second-hand market one can still find the
Olympus Zuiko Digital 50-200 mm f/2.8-3.5 SWD for 4/3 DSLRs, which gives
a good image quality. With a simple 4/3 to Micro 4/3 adapter, the OM-1, E-M1 III and E-M1 II (and
presumably the E-M1X) give a reasonably fast and accurate AF (although not as fast as a native Micro 4/3
lens, and the 50-200 only allows contrast-based AF, not phase AF). The OM-1 allows Subject Detection with
this lens, and provides the fastest AF with this lens among the cameras just mentioned, but the lens shows
its AF and IS limitations in low light (above image) or with fast-moving subjects.
Worse come to worse, there is even a really cheap and lightweight
M.Zuiko ED 75-300 mm f/4.8-6.7 II. It is a consumer lens in all respects, and does not work with teleconverters. The M.Zuiko ED 40-150
with MC20 teleconverter may give you better pictures than the 75-300 at 300 mm, but the latter is more
portable and can certainly produce decent pictures, especially in good light, with static subjects, and
with a modern camera capable of effective IS.
Panasonic also markets two or three lenses that can be potentially useful in bird photography with the
OM-1. I have no first-hand experience with them except for the consumer-grade
Lumix G Vario 100-300 mm f/4.0-5.6 II Power O.I.S., which is
comparable to the M.Zuiko ED 75-300 mm.
Configuring the OM-1 for birds
Configure Subject Detection, Bird mode
This part of the configuration is straightforward. In the Menu, AF → 2. AF → Subject Detection → select the bird icon → click OK.
This configuration charges the way the focus area is displayed on the rear screen or viewfinder. When
Subject Detection if off, all the AF points currently in focus are framed in small green squares. When
Subject detection is on, when a subject of the appropriate type is recognized, it becomes enclosed in a
large white frame.
To additionally display a smaller white frame around the closer eye of the subject, turn on the Menu,
AF → 2. AF → Eye Detection Frame setting. It helps me
to know that the subject detection algorithm has identified the eye, because in this case it gives to the
eye the highest AF priority. In virtually all cases, you want the eye of your bird subject to be in focus,
even when the whole subject cannot be completely in focus.
Note that Subject Detection is not the same thing as Tracking. In
earlier cameras, Tracking is available in the CAF + TR setting, while
Subject Detection in the OM-1 does not need the CAF + TR setting. Tracking only means that AF tries to
follow whatever is at the present focus point, as it moves across the frame, while Subject Detection means
that the camera additionally identifies the subject and its point of particular interest (usually an eye).
Subject Detection is faster and more reliable than Tracking. For one thing, Subject Detection is less
likely to start following an object of a different type after it accidentally crosses paths in front of
the currently tracked subject.
Ordinary AF, 300 mm + MC-20 handheld, no subject detection. Full frame, reduced (top) and 1:1 pixel crop
(bottom).
ISO 800 at 1/1500 s, f/8, JPG Fine.
Subject Detection is the best option with the OM-1. Older cameras of the E-M1 series lack
Subject Detection, and their Subject Tracking setting is far less successful.
On the OM-1, do not use Subject Detection simultaneously with Subject Tracking. These two
settings may send conflicting orders to AF, causing it to behave erratically.
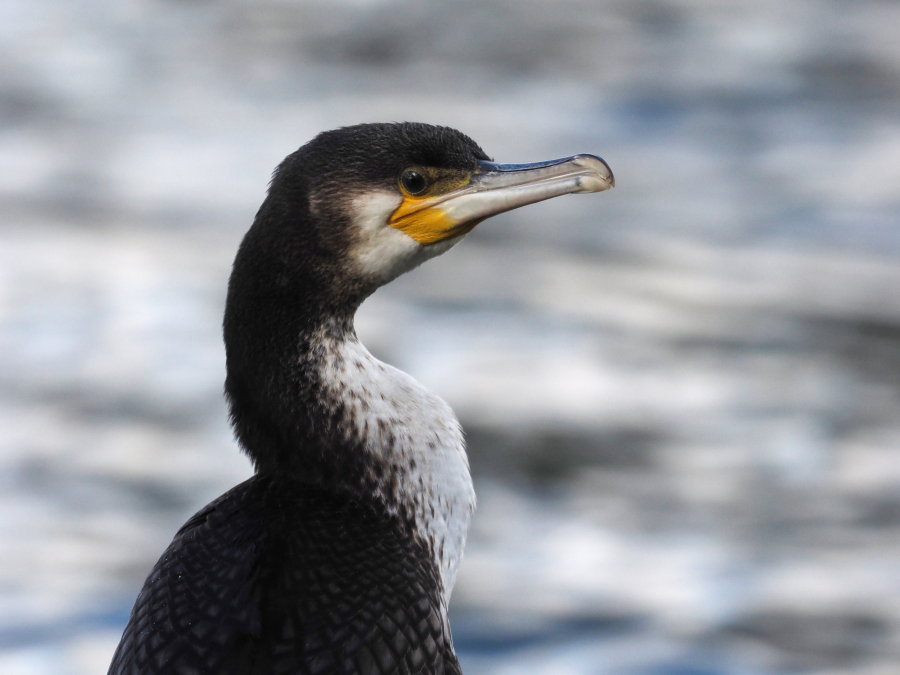
Subject Detection in Bird mode, 300 mm + MC-14 handheld. Full frame, reduced (top) and 1:1 pixel crop
(bottom).
ISO 250 at 1/250 s, f/8, JPG Fine.
I tested Subject Detection with stationary or swimming birds with the
Olympus 300 mm f/4 Pro and the Olympus MC-20 2x
focal length multiplier, and found that this feature dramatically increases the number of keepers even in
difficult light conditions. A situation when Subject Detection in bird mode is problematic is when
shooting single pictures (not sequences) in C-AF mode with multiple birds present in the frame, e.g. a
group of swimming ducks or geese with moving individuals at slightly different distances from the camera.
In these conditions, the subject is not tracked from shot to shot, and at each manual shutter tripping the
Subject Detection algorithm randomly chooses a bird (often not the same bird it had focused on in the
preceding shot) and refocuses on it. Apparently, minor differences in head orientation and visibility of
the eyes make the algorithm decide that it is better to choose another bird.
The easiest solution is of course shooting a sequence in C-AF, which ensures that the subject is followed
from frame to frame (unless the tracking algorithm "loses" it, e.g. because the subject passes behind an
obstacle or turns in such a way as to become unrecognizable - most often because its eyes are no longer
visible). Once back in the studio, you will then need to select the best shots out of each sequence. SD
cards are cheap these days, and the OM-1 RAM picture buffer is large enough to contain several shots (I
found mentions of 1.8 GB). I typically save only JPGs instead of RAW, do not find shooting more than 5-10
fps particularly useful, and the OM-1 battery seems to last forever (over 2,000-3,000 shots in silent
mode). Perhaps the electronic shutter uses far less energy than the electromechanical one.
For some reason, the second and/or third shot in each sequence seem to be the ones with focus most often
perfectly nailed. I guess what I am seeing is the subject detection algorithm using some of the
information from the first recorded image of each sequence to predictively refine the AF before the
following shot. If so, this is one more reason for shooting short sequences instead of individual images.
Configure the AF area
Especially for birds in flight, it is useful to use All AF points, or at least the
Large AF area, which uses an array of AF points covering a good third of the sensor area.
It is difficult to keep a flying bird centered in the viewfinder at all times, especially if flying
erratically, and All or Large AF selections help AF to do its job even
when the subject is not centered in the frame. I also suggest that you use a lens focal length moderately
lower than the one necessary for a close crop of the subject (e.g., 300 mm even though the subject would
fill the frame with a 400-450 mm lens). This will dramatically increase you keepers rate, compared to the
latter. You can always moderately crop an image afterwards to center the subject, but you cannot fix an
image that cut out the tail or half a wing of your subject.
Configure the drive mode and AF mode
Subject Detection works to keep the AF onto the critical point of the subject (usually the closest eye in
case of animals), and is therefore best used to sequence shooting. It cannot track between successive
exposures triggered in single-shot move. Therefore, you need to enable CAF (as opposed to single AF) and
one of the sequence drive modes that allow CAF before each individual shot (as opposed to single AF at the
beginning of the sequence, and no AF during the sequence).
In the Menu or SCP, set CAF + MF (which enables you to manually adjust focus). MF
adjustment is rarely feasible with birds in flights, and more useful, for example, if the frame contains
multiple birds on the ground and you wish to focus on a different bird than Subject Detection initially
chooses. As soon as you manually adjust focus, however, remember that you are on your own with respect to
focus. If you wish to restart AF, you need to release the shutter button and press it again half-way.
Configure the shutter mode
To reduce noise and vibration as much as possible, I use electronic shutter. There is a sequence-speed
penalty, but in my opinion well worth the results.
In the SCP, select Silent Sequential.
Configure Auto ISO
The idea with Auto ISO is that the photographer manually sets both lens aperture and exposure time, and
the camera automatically changes ISO to correctly expose.
Auto ISO is configured in two different places. In the Menu, set
1 → 3. ISO-A Upper/Default → Upper Limit → 12800 and
1 → ISO-A Upper/Default → Default → 200 for the upper and lower limits, respectively, and then for
example in SCP set the ISO to ISO Auto *** (the actual value displayed instead of ***
depends on light conditions). The ISO Auto *** setting is located between the highest
"hard" ISO value (ISO 102400 by default) and the wrap-around lowest
"hard" value of ISO L80.
Photography with Auto ISO is one of the combinations of settings I initially did not have much success
with. I used mostly the settings recommended by Keith Wallach for bird photography on the
Olympus learning site
(except e.g. for the fastest lens aperture unavoidably being f/8 with my 300 mm and MC-20). In conditions
of relatively low light (mid-day cloudy sky with quickly variable illumination levels) it produced
unpredictable results depending on the scene, exposing some scenes correctly, and underexposing other
scenes by a good 2-3 stops. The first picture on this page, for example, required a substantial
application of Curves in Photoshop to become usable. Other than this, I applied no post-processing.
Post-processing this image with modern AI-based noise reduction does substantially improve this image
beyond what is possible with in-camera adjustments, but I do not show the results here because we are only
discussing the camera itself.
Configure the mode dial
Turn the mode dial to M. It does indeed sound counter-intuitive that in order to use
Auto-ISO you must set the mode to manual, but the mode dial does not have any specific position for Auto
ISO (perhaps it should, but quite possibly the designers decided that this mode is not used frequently
enough to deserve such a position). You can also look at it as follows: M sets both
exposure time and lens aperture to a manually selected value, and the Auto-ISO setting makes the camera
adjust the ISO automatically.
Note that the first illustration in
Keith Wallach's article
is misleading if you have never used Auto ISO, because it shows a fixed ISO 800 in the
SCP together with the other settings discussed in the article, instead of the Auto ISO setting he
described in the text. If you simply copy the settings from this illustration into your camera, you will
end up with the wrong configuration.
The intrinsic risk with Auto ISO combined with manual exposure time and manual aperture is that the camera
will choose whatever crazy-high ISO is necessary to achieve a proper exposure, or if light is simply too
low for a proper exposure it will both use the aforementioned crazy-high ISO and underexpose (or
conversely, in intense sunlight it will use the preset minimum ISO, and overexpose). Your cue that
Auto-ISO is out of its range is the blinking Auto ISO in the lower-right corner of the
LCD screen overlay (or the blinking ISO Auto in the SCP), which you might miss if you
don't keep an eye on it. Note also that the preceding sentence is correct: this setting is called
Auto ISO in one place in the GUI, and ISO Auto in another place.
If you, like I initially did, set a relatively low value for the upper ISO limit, thinking that this will
help to avoid a high image noise, the camera will not go higher than this ISO value, and instead it will
start underexposing a lot sooner than if you had set the maximum ISO at a high value. So you need to
decide: either set a relaitive low maximum ISO and risk to ruin the shot, or a higher maximum ISO and risk
a high noise but take home the shot nonetheless.
Summarizing, in Auto ISO you must either accept the risk of underexposing, or the risk of getting a very
noisy image. To reduce either risk, you must keep an eye on the actual ISO value in the screen overlay and
on whether it is blinking, and choose a longer exposure and/or a faster aperture if it blinks.
Manual exposure compensation
A further problem with the Auto ISO mode is that manually under- or overexposing cannot be done with the
front dial (which by default has this function in A mode). In Auto ISO mode, the front dial changes the
lens aperture, the rear dial changes the exposure time, and neither of the dials is available for manual
exposure compensation.
I tried assigning the top and bottom buttons of the multi-selector to Exposure Comp. in
the custom settings, but this still does not allow me to under- or overexpose. It only changes the
exposure time, and ISO still tries to compensate accordingly. The only way I found to apply a manual
exposure compensation is in the SCP. If there is a way to assign a custom control to exposure compensation
in Auto ISO mode, I have not found it.
Birds in flight
I have not tested the OM-1 on birds in flight to the same extent as on stationary birds. However, with the
same Auto ISO and bird detection settings discussed above for stationary birds, I have noticed that the
percentage of keepers is much higher than with the E-M1 Mark II, which has no Subject Detection.
I find the 300 mm with the 2x TC-20 teleconverter too difficult to use for birds in flight without the
EE-1 red dot sight. The main problems are initially locating the subject in the
viewfinder, and then keeping it in the viewfinder while panning to follow its turns and dives. On the
other hand, I found it much easier than I expected to track a flying bird with the 300 mm and 1.4x TC-14
teleconverter. Keep in mind that the latter combination is equivalent, in field of view, to an 840 mm
full-frame super telephoto, so your success in tracking a bird in flight while hand-holding in such
extreme conditions may differ from mine. In either case, the success rate greatly increases when allowing
for a wide margin around the subject in the picture frame, followed by cropping in post-processing.
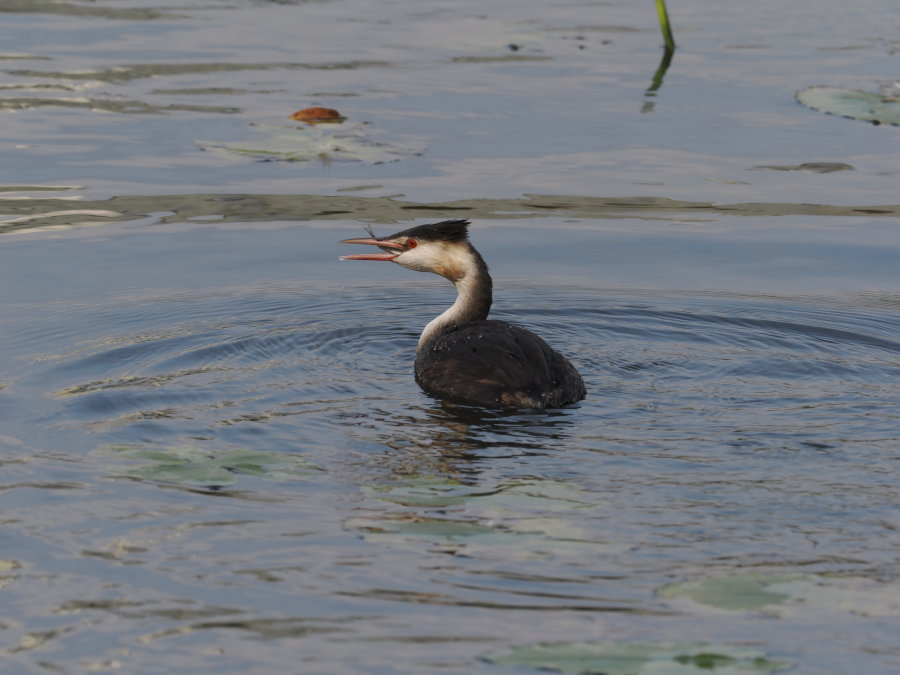
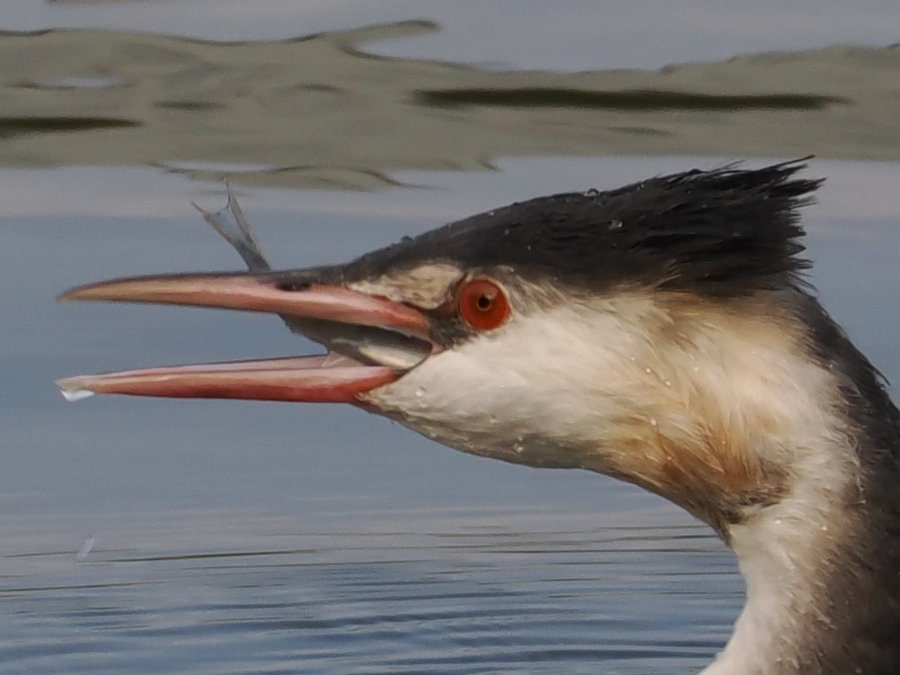
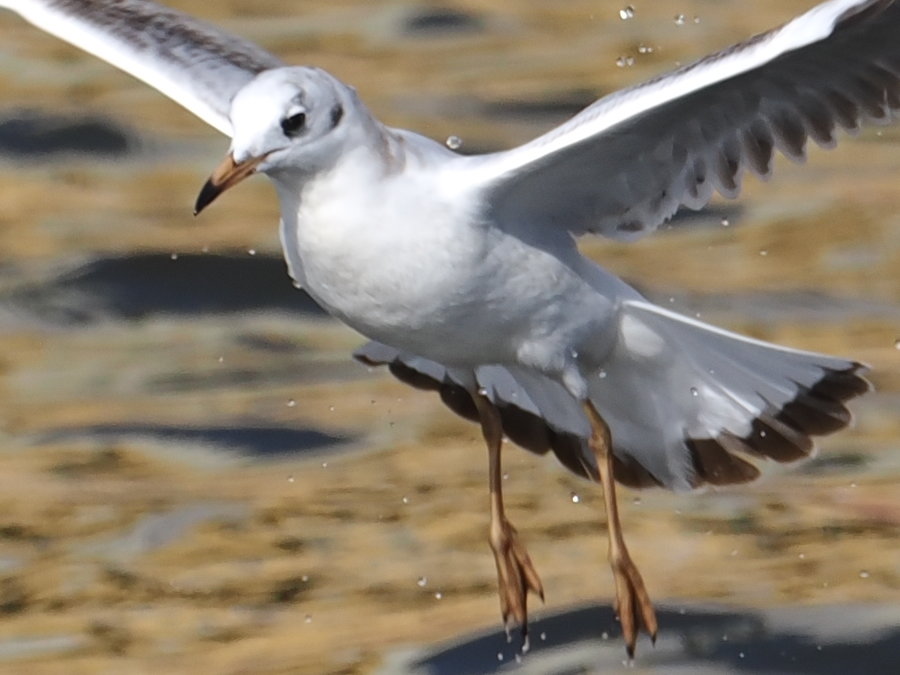
Subject Detection in bird mode, bird in flight, 300 mm + MC-14 handheld. Full frame, reduced (top) and
1:1 pixel crop (bottom).
ISO 200 at 1/750 s, f/6.7, JPG Fine.
Of course, subject motion is a much bigger problem than with stationary birds, and IS cannot completely
stabilize the camera while the photographer keeps panning in different directions to try and follow the
unpredictable changes in direction of the subject. Nonetheless, it is still possible to shoot birds in
flight at ISO 200 in sunlight, as the above example shows. This particular subject had taken flight from
the water surface less than one second earlier, as shown by the water droplets surrounding it, and I
managed to capture it only thanks to the wide margin allowance surrounding its original position on the
water surface (visible in the top picture as an area of turbulent water). With a longer focal length, I
would have completely missed the shot.
Another example of birds in flight.
In adition to the settings described above, the main "secret" with birds in flight is shooting relatively
short sequences, and lots of them. Eventually, you will get a few images than will make your day. The OM-1
cannot increase your artistic skills, or improve your panning reflexes, but will help you by
substantially increasing your keeper rate in terms of correct focus and exposure.
A hare successfully shot with Subject Detection in Bird mode (moderately cropped).
I even attempted to use Subject Detection in Bird mode for mammals, and the OM-1 had no problem with these
subjects. After all, also mammals have characteristically identifiable eyes, and are not very different
from birds in this respect. The above subject also has plenty of fur details that are easily identified by
ordinary phase AF.
A test of a distant helicopter shot with Subject Detection in bird more was less successful, with all
images being very slightly fuzzy. Subject motion is partly to blame for this, but it also seems that focus
is slightly off in all images, perhaps because Subject Detection was unable to identify the subject. In
this case, I did not have the time to dive into the menu to change the type of subject. If you frequently
use Subject Detection for two or more different types of subject, it might be a good idea to assign each
subject type, with its specific associated settings, to a different custom mode.
Maximum of 4 custom modes
The OM-1 only allows four custom modes, and as far as I know does not allow more. I seem to remember that
my Olympus E-M5 had three custom modes configurable in the menu, but only one of them at a time could be
assigned to C on the Mode dial. To remember which of the custom modes was active, it was
possible to set a different color of the focus box for each mode. The OM-1 has no additional custom modes
in addition to the four on the Mode dial.
C1 is generally used by photographers for birds in flight. You may of course choose
another bank of custom settings for this use, but following common conventions may help you to remember
which custom bank does what.
You can use the PC software to create backups of custom modes and restore them to the camera, and in this
way overcome the limitation of four custom modes, but this requires planning in advance what type of
photography you will carry out. You can even back up custom modes to your phone and restore them to the
camera in the field, but this also requires time.
Summary
Both Subject Detection and Auto ISO in the OM-1 can substantially improve your success rate in bird
photography. Choosing the correct settings, however, requires some good guidance to choose the initial
settings, as well as your careful experimentation to refine them.