Wild/Leica M420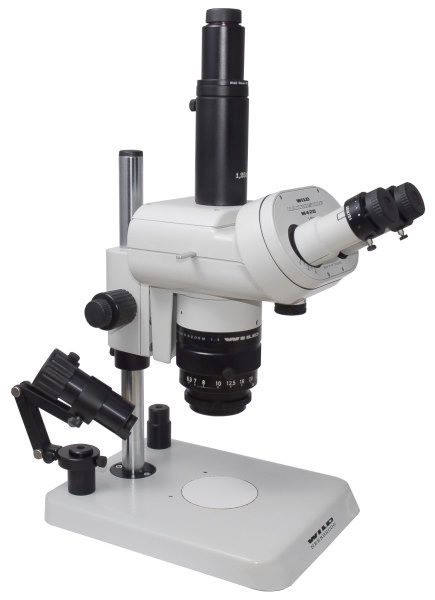
The Wild M420 photomacroscope (Figure 1) is a physically large microscope that resembles a stereomicroscope in external appearance. The M420 is designed to observe and photograph subjects primarily in a magnification range between 7.9x and 40x. It is a composite microscope, i.e., its objective produces an intermediate image in a focus plane in the air inside the microscope, and an ocular further enlarges it. The M420 also produces an erect (i.e., non-inverted) image in the oculars like stereomicroscopes. However, the similarities between the M420 and a stereomicroscope end here. A stereomicroscope has independent optical paths for either eye, and produces images that, when viewed, are perceived as three-dimensional. Most stereomicroscopes have separate objectives and oculars for the left and right eye, and completely separate optical paths. Photography through a stereomicroscope, in almost all cases, uses either the left or the right optical path, which means the subject is not viewed from straight above, but from a slight angle. As a result, the plane of focus is not exactly horizontal, but slightly inclined. Some high-end stereomicroscopes use a so-called Galileian optical system, i.e., they have a single, wide-field objective instead of two separate ones, and either optical path follows a slightly different direction through this objective, in order to produce a 3-D image. In these microscopes, the optical path used to take photographs can be designed to pass straight through the objective, instead of being slightly inclined to either side. This solves the problems mentioned above, but introduces a new one: the photographed image is not exactly the same as that viewed with either the right or the left eye. Alternatively, stereomicroscopes with Galileian optics can use either the left or right optical paths for photography, with the problems mentioned above. In any case, a stereomicroscope, although often being able of producing good pictures, is not an instrument optimally designed for photomacrography. The M420 solves these problems by doing away entirely with two separate optical paths, and does not produce a 3-D image. Instead, it is geared primarily toward photography and/or quantitative measurements, and the image plane is viewed from a precisely vertical direction, with exactly the same image seen by the left eye, right eye and camera. In this respect, the M420 photomacroscope is more similar to a conventional microscope of the type used for high-magnification work. The M420, however, produces an erect image in its oculars like a stereomicroscope, instead of an inverted one like a typical compound microscope. Wild, and subsequently Leica, called theM420 a photomacroscope (Photomakroskop in German). This probably reflects a wish to indicate its intended use in the photomacrography range of magnifications. Models without a photo tube (see below) were similarly called macroscopes.The choice of this name is not correct from a technical point of view, because the M420 is indeed a compound microscope in optical construction. On the other hand, this is not the only example of an improper name (e.g., see the Micro Nikkor line of lenses made by Nikon, which actually are macro lenses). The M420 has a manual aperture control, which closes and opens an internal diaphragm, located at the bottom of the microscope body, immediately behind the objective mount. Its scale has a few graduations for reference, albeit not calibrated in any visible units. There is a click-stop, or detent, roughly half-way, which the documentation says to correspond to the best compromise between depth-of-field and resolution. However, the "best" position actually depends on the magnification, on whether you are using an add-on lens, on the subject, and on the judgment of the photographer, so it is not necessarily the one indicated by the click-stop. If you do close the diaphragm past this detent, you can expect resolution to be visibly lower, especially at higher magnifications. Whether this is acceptable in return for additional depth of field, or unacceptable, is up to your judgment and the intended use of the picture. A thin metal lever crosses the centre of the microscope body and emerges on either side, where it can be pushed in. Its right end is black, while the left end is chrome-plated. It does not move a beam-splitter in and out of the optical path as you might think (e.g., like the knob on the left side of the earlier Wild M400 does). Instead, the lever in the M420 only moves a thin metal shutter that blocks or allows light into the eyepieces. Pushing in the black (right) end of the lever blocks the eyepieces. Regardless of the position of this lever, the photo tube always receives 50% of the light. You may close the shutter while taking pictures, if there is a lot of ambient light that could enter through the eyepieces and cause internal glare. Normally, I do not believe this is a problem. Stands and accessoriesThe Wild (not Leica) M420 is available with several different stands. The table-top stands (Figure 1) usually have coaxial coarse- and fine-focus controls. The fine-focus control is very useful for photography, especially in focus-stacking. Their bases are available in different models for reflected, as well as transmitted, illumination. There are also large photographic stands with a thick (50 mm) and tall column (see a stop ring for this column in Figure 2, right), and one or a couple of boom stands. The M420 and related models (see below) are often available on the second-hand market with large XY tables for semiconductor wafer inspection, and other special uses. The focusing mechanism may have fine-focus knobs on both sides, or a single fine-focus knob on one side (as originally built, on the left side, but it can be reversed). The fine-focus axle is coaxial with coarse focusing, and connected to the latter by planetary gears. As a result, turning the coarse-focus knob causes also the fine-focus knob to revolve, and vice versa. The fine-focus knob, therefore, does not have a limited focus range like the fine-focus of high-magnification microscopes. The moving platform runs on cylindrical steel rollers (or, in early variants, steel balls) placed in cages on either side of the platform, and when properly lubricated moves very smoothly. Most Leica-branded specimens of the M420 use the same Leica stands and focusing mechanisms of their modern stereomicroscopes (i.e., a black metal column with a thin wall and an oval cross-section, a moving platform holding grooves on the column sides between two teflon pads, and a wide black plastic geared rack attached at the front of the column). The coarse and fine focus knobs, and sometimes other adjustment and locking knobs, are made of off-white plastic, with a marked tendency to become yellow (or even brown) and brittle with age and exposure to light. I never liked these columns and focusing gears, finding the column relatively flexible and the geared rack potentially vulnerable to wear and stripping if not handled well. The reason for these inferior mechanical parts, of course, is that proper ones would be much more expensive. The older Wild stands and gears are much more rigid and durable, and will last forever with proper lubrication once every few years. 
Middle: Wild 62 mm split-ring and spacer for attaching a light source at the bottom of the M420 objective. Right: Wild stop ring for the 50 mm column of the large photographic base (top) and 25 mm column. A stop ring on the stand column (Figure 2, right) is very useful to prevent the microscope from falling down the column when unlocked, smashing the objective against the base. This accessory can literally save a microscope, but sometimes specimens are sold without it. A variety of Wild and Leica reflected-light illuminators were available. Most Wild stands have two short metal stubs (with a 25 mm diameter near their top) at either side of the column, used to fasten light sources to the base (Figure 1, and Figure 2, left). In some stands, the column has the same diameter, and the same lights can be attached also here. Light sources can also be attached with two 62 mm (internal) split-rings (or a ring plus a spacer for a single light source) to the front of the objective (Figure 2, center). Once you find or make attachment rings of the appropriate size, almost any light source designed for use with stereomicroscopes can be used (or made, e.g., with white power LEDs - the "soft" white type is better for visual observation, the "daylight" white type is usually better for colour photography). Note that Wild stereomicroscopes often use a smaller split-ring with an internal diameter of 52 mm to attach light sources to the objective barrel. While attaching one or two light sources to the base stubs is convenient, in this case the light sources must be re-oriented when thick subjects are observed/photographed. Attaching the light sources to the objective barrel, instead, avoids this operation, because the light sources follow the objective during refocusing. If you are taking pictures for focus-stacking, on the other hand, you should only use light sources attached to the microscope base, so that they do not move relative to the subject. The original Wild/Leica stage accessories include a circular gliding stage with a rather restricted motion range (about 10 mm from the centre position) and a hemispherical stage that sits onto a circular ring and is used to incline the subject plane in any direction. Either stage, or both used together, are quite useful in photomacrography, but subjects tend to glide off if an inclination exceeding 15-20°is used (in these cases, double-adhesive tape can keep a subject in place). In spite of its rather simple construction, the hemispherical stage is scarce, and typically advertised at extremely high prices on eBay. A cheap substitute can be built by filling half of a rigid plastic or aluminum ball with weighted plaster or epoxy (lead pellets are ideal as ballast for this application), and optionally attaching a slightly larger round plate (e.g., one of the round plates used on stereomicroscope stages, typically made of aluminum with a black and a white side) onto the flat surface. This half-ball can conveniently sit in a heavy metal cup or a short section of metal pipe with an opening of 2/3 to 3/4 the ball diameter. Objectives, add-on lenses and magnification range
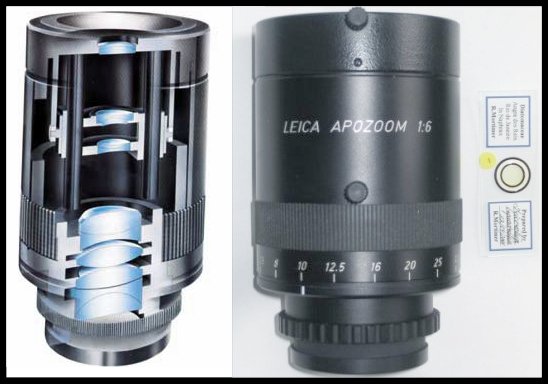
The Wild M420 was available only with a "Macrozoom" (actually marked Makrozoom on the barrel) objective (Figure 3) with a magnification scale ranging from 6.3x to 32x, i.e., an approximate zoom ratio of 1:5. The microscope body and photo tube further magnify the image by 1.25x. Special add-on lenses bayonet-mounted under the objective modify the magnification by 0.5x, 1.5x and 2x. A polarizer and a quarter-wave plate were also available. Some of these accessories have male and female mounts on either side and can be stacked together, while others have only a single male bayonet for attaching at the bottom of the macroscope lens. The Leica M420 was offered for a while either with the Macrozoom objective of earlier models, or with an "Apozoom" with a zoom range between 5.8x and 35x (1:6), said to provide higher resolution and better colour correction. This objective has matched 0.4x and 2x add-on lenses different from those used on the Macrozoom. A picture of an Apozoom objective accompanies this online article on the Leica M420, and both lenses are illustrated here. Later specimens of the Leica M420 were offered only with the Apozoom objective. There is also at least one model of Macrozoom that provides a higher total magnification (albeit with a similar zoom range to the "normal" Macrozoom), but this is rarely seen. The Macrozoom and Apozoom are easily distinguished in photographs, even if you cannot read the labels on the lenses. The Macrozoom has a white part of the barrel (the closest one to the microscope body), while the rest of the lens barrel, including the zoom ring, is black. The microscope body ends with a flat undersurface. Any cylindrical part that projects below this is part of the lens barrel or lens plus axial illuminator barrel. The Apozoom is somewhat longer than the Macrozoom, and entirely black. Do not confuse the objective barrel with the black add-on barrel containing the axial illumination components, present in some specimens, which sits between objective and microscope body. If you see a white ring about 3 cm high anywhere between the top and the middle of the cylindrical objective barrel, or objective plus illuminator barrel, you are looking at a Macrozoom, not an Apozoom.
Leica provided an adapter to mount a Macrozoom or Apozoom objective onto some of their more modern macroscope bodies. This adapter may well have a built-in tube lens, but it is unknown to me whether additional tube lenses are present within the bodies of these macroscopes. It may turn out that this adapter is also useless for the purpose discussed above. An industrial macrozoom of the type discussed here may be more successful for this application. Although these lenses are made for videocameras with smaller sensors than those used in DSLRs, adapters for DSLRs do exist to increase the size of the image circle. EyepiecesThe standard eyepieces are 10x 21, with a barrel diameter of 30 mm. One of the eyepieces (usually, the right one) carries a special reticule for focusing and framing the image to photograph, calibrated for 24x36 mm negatives. A smaller format DSLR sensor and/or a third-part photo relay lens in the photo tube will require a custom-modified reticule, a photo tube of non-standard length, and/or some guesswork and checking in the camera viewfinder. In practice, unless you need to take a lot of pictures on a daily basis, this is less of a problem than it may seem. However, you do need a reticule in one of the eyepieces, if you want to avoid the need to focus through the camera viewfinder before taking pictures. In the lack of the original reticule, any reticule with few fine lines will suffice to focus through the eyepieces, once the photo tube has been properly calibrated, but exact framing in the eyepieces is a bigger problem. Reticules with a dense grid should be avoided unless specifically needed, because they may interfere with qualitative observation. The photo tube uses a third eyepiece, also with a 30 mm diameter. As originally configured, the standard photo eyepiece is a 10x 21, optically identical to the two observation eyepieces but lacking diopter adjustment. This produces a suitable image on large-format film. A DX Nikon DSLR and most other "half-frame" DSLRs could instead use a 0.7x photo eyepiece to fill their sensors in a way similar to the image seen through the eyepieces. A 1x photo eyepiece can be used, but the image seen through the 10x viewing eyepieces in this case is smaller than the field covered by the camera. A full-frame sensor requires an approximately 1.2-1.5x photo eyepiece. In many cases, it is possible to use the 10x eyepiece, combined with 0.07x and 0.12x relay lenses, respectively. Intended market and actual usersWild and Leica targeted the sales of the M420 primarily at research laboratories and universities. A web search for this microscope model turns up literally hundreds of quotations from the "Methods" section of scientific papers, especially in biomedical and life science. This shows that the above marketing strategy is indeed a success, and also that the M420 is frequently used for visual observation, rather than (or in addition to) photographic documentation. In fact, the M420 is much more versatile than its Wild M400 predecessor (unless this model is modified to carry a generic camera) and the models without photographic capabilities (all discussed below) . For universities, it is very important that equipment can continue to be used practically forever (i.e., at least 30-40 years in the case of microscope equipment), and that it has multiple uses instead of just a single, specialized one. The M420 fulfills both criteria by allowing the use of virtually any camera or video camera (with a suitable relay lens and camera attachment), as well as being excellent for visual observation. On the other hand, models without photographic capabilities are far less popular in academic environments, and largely restricted to the semiconductor and metal industry. The M400 model was more complex, larger (because of its additional electronic control box) and originally more expensive than the M420, and requires rather expensive modification for use with modern cameras. Because of this, M400s often lie unused in university cupboards. Keep especially the last of these drawbacks in mind if you are offered a used M400. Related Wild and Leica modelsWild M400 - The first Wild photomacroscope was the M400, introduced in 1976. It uses a special-purpose camera body for 24x36 mm pictures, controlled by a large electronics box separate from the microscope. Large-format 4x5 in. and Polaroid bodies were also available The microscope body contains several mechanical and electronic components of the photographic system (e.g., the shutter). Light can be directed by a beam-splitter to only the eyepieces, only the camera, or both. The microscope body contains also a manual aperture control, with a knob located on the underside of the body, near the objective. A variety of stands were available for either reflected or transmitted illumination. Axial illumination was also possible by using an accessory mounted between the body and the objective. Using the M400 with a digital camera requires the original photo tube to be discarded and a new one supplied, and internal components to be removed. Some users, however, find the presence of a beam splitter with multiple settings particularly useful, and better in this respect than the M420. LMScope makes (or at least made in the past) a photo tube for this purpose. McBain Instruments also did provide a conversion service in the past, but their company changed name and their web site was for a while reduced to its front page alone. It is now working, but I can no longer find the M400 modification kit. I am told that Spauwen Research can provide a conversion. Wild M450 - Introduced in 1976, together with the M400. It does not have a photo tube, and is geared toward observation and quantitative measurements through the oculars. The microscope body contains an axial illumination light source at the top, which shines through the objective. Its specifications are otherwise the same as the M400.
Wild/Leica M420 - I don't know exactly when this model was introduced. It was originally produced with the Wild brand, and subsequently branded Leica (but is otherwise identical to the Wild one, except for the objective as noted below). The main differences from the Wild M400 are that it uses a photo tube capable of accepting, in principle, any camera, and that its body is simpler and does not contain camera-related components. It seems that production of the Leica M420 was discontinued around 2003, but some resellers likely still have unused specimens in stock. It is also possible that the body of the M420 was produced for some time afterwards, as a part to be integrated into newer systems. Wild M410 - This is similar to the M420, but has neither a photo tube, nor a built-in axial illuminator. It is typically configured with an axial illuminator between body and objective. It is otherwise identical to the preceding models. I have seen only Macrozoom (not Apozoom) objectives mounted on this model, and only Wild-branded specimens, but I don't know when it was introduced and when its production stopped. Assuming you could substitute a beam-splitter for the reflecting internal prism that directs all light to the objectives, or a simple mechanism to move this prism aside for photography, it should be possible to add a vertical photo tube at the top of the microscope body. LMScope makes a photo tube, intended for modifying the M400, that could be used for this purpose (albeit, if you plan to modify an M410, you cannot count on LMScope's help). You should attempt the conversion only if you are skilled in optics construction and precision machining. Leica Z6/Z16 system - This is the current Leica offering, first announced in 2004. It includes Z6 and Z16 apozoom objectives (with zoom ratios 1:6.3 and 1:16, respectively) and a large variety of viewing heads, focusers, columns and bases. The body of the M420 is still illustrated as a part of this system (albeit without a part number, which may indicate it is there only as a way to indicate an upgrade path from older systems), and attaches to the two above zooms via an adapter ring. The prices of this new system are well above what is normally accessible to an amateur. As a whole, this system is still too new and expensive to be offered on the second-hand market. I have found virtually no third-party information on it, and it appears to be far less popular than the M400/M420 series in university research (which figures out, since its introduction roughly coincided with an almost word-wide crunch on public spending for universities and basic research). Only a handful of scientific papers cite these systems in their "materials and methods" sections. It does appear to be a "dream setup" for photomacrography, albeit, it is likely to remain a dream for most enthusiasts, at least for the next two or three decades. However, I doubt it actually produces images visibly much better than those produced by an M420 with either Macrozoom or Apozoom objectives (or even Zeiss Luminar lenses of later series) in the same magnification range, because all these optics are already very close to the maximum theoretically possible performance. In the hand of an expert photographer, they differ in convenience of use, rather than final image quality. The Z6 and Z16 zooms seem to be used without modification also in Galileian stereomicroscopes like the Leica MZ16. Second-hand valueIt is difficult to state a reasonable price for a second-hand M420 in good condition. I bought mine in 2008 for about 900 € including shipment, with Macrozoom objective, three 10x eyepieces, no add-on lenses and no light sources. The other models described above should sell at lower prices, because they cannot be used conveniently for photography without modification, and therefore are less in demand. A model equipped with an Apozoom objective should command a somewhat higher price. A few second-hand specimens of M420 are currently advertised by online shops, sometimes at prices exceeding six times what I paid for mine. Extra accessories do warrant higher prices, but not at these levels. These specimens have remained unsold for years and show no signs of "moving" in the near future, so their price tags are oviously excessive and unrealistic. Corporate history relevant to the M420The change from Wild to Leica in the branding of the M420 photomacroscope during its production history is due to the gradual absorption of Wild Heerbrugg into Leitz/Leica. According to Wikipedia, Wild Heerbrugg was purchased by Leitz in 1988, renamed Wild Leitz AG in 1989, and incorporated into Leica in 1990. Leica Microsystems AG was split out of Leica in 1998, and continued the production of microscopes, including the M420. Some of the above models were also sold with the Vistec brand, especially in the United States, but these were simply re-branded items containing the very same parts in the microscope bodies (some of the stands may be third-party ones). In any case, the M420 body was produced in the same factory facilities throughout its history, with the exception of external Leica and third-part components like the focusing mechanism. Maintenance and realignmentThe M420 and related models are solid microscopes, with the whole body casing cast in aluminum alloy and the lens barrel and internal mechanics in machined aluminum and brass. Their optical system contains a larger number of prisms than typical stereo microscopes. All prisms are glued together and to chassis parts, and should never require re-alignment. They have numerous surfaces exposed to the air, which may accumulate dust and need to be cleaned in second-hand specimens that have been used in dusty environments. Access to the prisms requires the body to be partly disassembled. The service manual is indispensable to carry out these operations - see the documentation links at the bottom of this page. Second-hand microscopes, and especially those older than about 20 years, have well-known potential problems. Lubricants stiffen with age, and sometimes effectively turn into cement. Dust accumulates on optical surfaces. Screws and bolts become stuck and difficult to loosen. Optical parts may have been knocked out of alignment by accidental falls. Rust and corrosion may weld metal parts together. If the equipment has been seriously mishandled, dumped in water or exposed to corrosive chemical fumes, it may well be beyond any chance of repair. The external appearance of the equipment is often a good indication of its internal state, so it is a good idea to pass up on equipment with unusual traces of wear, visibly rusted bolts (the latter may not be so important on the microscope base, but I would never buy one with rusted screws on the body casing) or visible bumps from impacts. Beyond this, if you are buying online, you are largely at the mercy of the seller's honesty and/or expertise, especially if the item is advertised "as is". Inquire about return policies before you buy (if you return an item bought online, normally you will have to pay the postage both ways, and some sellers accept no returns), and hope for the best. Almost all the second-hand microscope items I bought on eBay were actually in good or usable conditions, and largely as advertised, but once I did happen to receive a stereomicroscope that had been dumped into sea water, then dried and cleaned outside but left to rust inside. This particular one was completely unusable except for its stand and focusing mechanism. The M420 shown in Figure 1 was externally in rather good condition, but, as received, displayed a gross misalignment in the images seen through the oculars, which made it unusable without realignment. It turned out that a previous (amateurial?) attempt at realignment had left three key adjustment screws loose, which not only caused the optical problem but also prevented the microscope from being disassembled again. A few additional screws and threads were stuck, some of them requiring the screw head to be removed. I did solve the problems with an appropriate combination of skilled tinkering and brute force (involving even drilling holes very close to the optical surfaces), and in the end did manage to disassemble the equipment without ruining it and without leaving external traces, but it was a close call. Once the body was properly reassembled, the misalignment disappeared by itself. Documentation
Various manuals for the M420, M400 and M450 are available here. In
addition, you may be interested in more modern Leica photomacroscopes that replaced the M420: |