Tenba Axis 24 L backpackThis page is an ongoing, personal review of the Tenba Axis 24 Lliter / litre camera backpack. I got this backpack in mid-2020 and so far I have used it only for short excursions, but plan to test it in the future on intercontinental trips. I have used plenty of camera bags and backpacks in the course of over four decades of photography. During the past two decades, these include multiple models of camera backpacks from Tamrac and Lowepro, as well as backpacks designed for trekking and equipped with third-party camera inserts. The Tenba Axis 24l, however, is my first tactical camera backpack (where "tactical" does not mean that it has been designed as a piece of military equipment, but only that it shares some features with military backpacks, in particular the PALS modular attachment system for external add-on pockets, sleeves and bags). This type of attachment is often called MOLLE, or even Molle. However, strictly speaking, the MOLLE system is a different standard. I did earlier use two backpacks with PALS system (Wisport Caracal 25 L and Wisport Sparrow 16 L), but they are designed as trekking backpacks and I converted them to camera backpacks by adding third-party camera inserts. I also use a few Tenba BYOB inserts, lens capsules and battery pouches, and find them well made, although a bit on the expensive side. While looking for a tactical backpack, the only two competitors that satisfied my main requirements (see below) were the Tenba Axis series and the Lowepro ProTactic series. The two series are comparable in general construction, but in the end I chose the Tenba Axis in part because it offered a few extra features, and in part because I already used Lowepro backpacks and bags for several years and wanted to avoid some of their known weak points. My main requirements:
No backpack that I know of satisfies all the above requirements. This is why I specified some of these as "must have", and others as "nice to have". Tenba currently makes three sizes of Axis backpacks: 20 L, 24 L and 32 L. The 20 L is handy and unlikely to attract the attention of flight attendants ambushing passengers at the plane door to force them to check-in their carry-on luggage. However, this size is just a little too small for me. The 24 L is just a little bit bigger: 2 cm wider, 1 cm higher and 2 cm deeper. The extra 4 liters of volume would make a big difference, assuming that all the space can be put to good use. In practice, however, some of the extra volume is in the laptop sleeve and rear pocket, so maybe the increase in volume available to camera equipment is only around 2 L. This pack size can hold a camera attached to a 300 mm f/2.8, which can be extracted either through the main hatch or the top hatch. The 32 L is 5 cm wider, 7 cm higher and 3 cm deeper than the 20 L, which is a very visible difference. Given my experience with forced "surprise" check-ins at the plane door, I do suspect that the Axis 32 L would frequently be selected for this treatment, even if it fits all nominal size and weight requirements for carry-on luggage of the airline. Just to make a comparison easier, the following table is a summary of metric sizes of the three models, as specified by Tenba. You should take them with a grain of salt, since probably they are rounded to the closest cm, and in any case the size of a soft-walled bag is not fixed but depends on how the contents are packed.
Lowepro tactical backpacksLowepro currently makes two camera backpacks of a design comparable to the Tenba Axis. They are the ProTactic BP 350 AW II (rated at 16 L) and 450 AW II (25 L). They differ from the Tenba design, among other things, in having quick access hatches on both sides and on top, in addition to the main access hatch on the back. They also have an accessory pocket on either side, a small pocket on the right side of the hip belt and a really small one on the left side, but no rear pocket. The lack of a rear pocket makes the Lowepro ProTactic look wider and less deep than the Tenba Axis. Personally, I prefer one large external pocket than several small ones. At least, when I am looking for something I only have one pocket to search. Keping all my small stuff in an organizer bag that can instantly be taken out of this one pocket is a further advantage. Security-wise, the four zippers of the Tenba Axis may be a little easier to keep an eye on than the eight ones of the Lowepro proTactic. The most significant difference between the Lowepro ProTactic and Tenba Axis is that the shoulder straps are attached to the main body of the pack in the ProTactic, but to the main hatch in the Axis. This allows the Tenba Axis to better adjust the height of the pack on one's back, which is a plus for persons with non-average body frames, while the Lowepro packs are more limited in this respect. The Lowepro Proactic backpacks have no built-in dedicated pocket for a water bottle, although one could be attached to the webbing on a side hatch. This gives me the impression that the Lowepro ProTactic are designed just as purebreed camera-and-laptop backpacks, while the Tenba Axis acknowledge the importance of the photographer's need for hydration. The Lowepro ProTactic webbings are not strictly complying with PALS specifications. The horizontal spacing of the stitchings along ribbons alternates between a standard PALS spacing and a spacing wider than the latter. This is probably a way for Lowepro to make the webbings compatible with both its newer PALS accessories and its older proprietary accessories with an attachment tab much wider than the PALS specification. This deviation for PALS could make it dificult or impossible to attach wide PALS pouches, which may have four or five attachment tabs, to Lowepro proTactic backpacks. If you are planning to combine ProTactic backpacks with wide PALS pouches, you may want to try doing so in a camera shop to make sure it works. The price of the 450 AW seems to be roughly comparable to the Tenba Axis 24 L. At 2.84 kg, the ProTactic 450 AW II is significantly heavier than the Tenba Axis 24 L (2.1 Kg). The general appearance of this series is, like the Tenba Axis, tidier than most camera backpacks. Counterfeit Lowepro tactical backpacksAn additional concern when buying a Lowepro ProTactic backpack by mail order is that there are numerous reports of counterfeit Lowepro ProTactic items, complete of fake Lowepro labels, virtually always manufactured in China. They are commonly sold on eBay and Aliexpress, but might also find their way to unscrupulous sellers in other countries. See for example this detailed article. Sellers of these counterfeit items have stated that these are knockoffs rather than fakes (the implied difference being that knockoffs are produced on the same factory lines as the genuine items and may differ in small details like branding, while fakes are items of clearly inferior quality produced by manufacturers without connections to the original branded items). This is not true. These Lowepro ProTactic-lookalike backpacks are of clearly inferior quality, and therefore fall under the "fake" denomination. Common complaints are that the fake backpacks are smaller than the genuine ones, their stitching comes easily loose, paddings are thinner and more flexible, latches are often defective and do not lock safely, and the size of padded inserts is wrong for the size of the backpack interior. The knowledge that fake Lowepro ProTactic backpacks are common, however, does not make it any easier to buy a mail-order item at a discounted price without falling into the trap of a fake item of unsatisfactory quality. Rather, the uncertainty may actually discourage potential buyers from ordering Lowepro items, and deliver them into the arms of competitors like Tenba (as long as there still are no known counterfeit Tenba backpacks on the market). The Tenba Axis 24 L in practiceTenba is a US-based brand specializing in bags for photographic equipment. In addition to a broad range of camera backpacks and shoulder bags, they market bags and rolling cases for photographic studio equipment and a line of padded inserts, lens cases, lens pouches, padded wraps and related storage solutions for small to medium-sized photographic items. 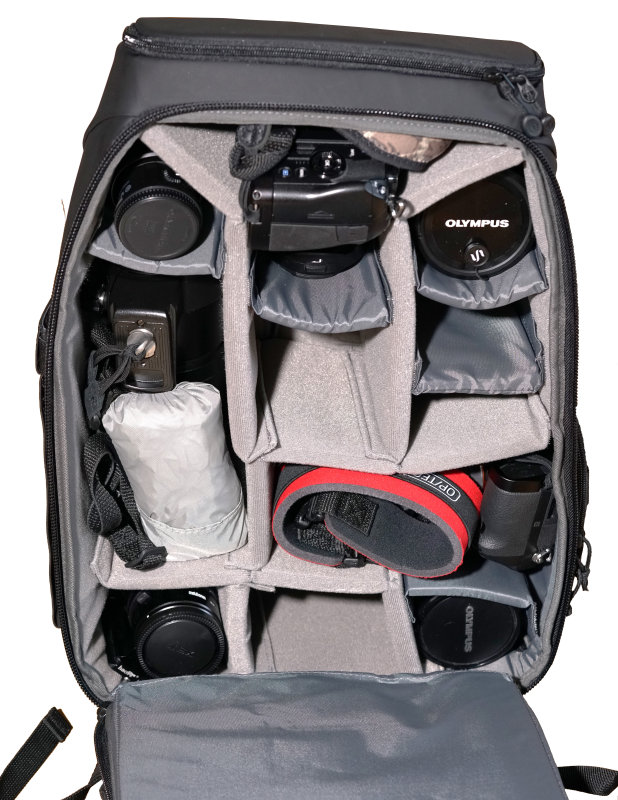
In the above figure, the insert contains exactly the same equipment shown in my discussion of the Wisport Caracal backpack, plus the rain cover of the Tenba backpack (small light gray bag on the left). While the insert of the Wisport Caracal is full, the Axis insert could take three or four more lenses. The sagging of the 20 L Lowepro insert I used in the 25 L Wisport Caracal causes the corresponding amount of space to be wasted. In addition, in the Axis 24 L, a little unused space is also available in three of the occupied lens compartments, and could be used for spare batteries and other small gear. 
Some of the images of the Tenba Axis 24 L on the web (e.g. in the B & H web shop) show a strap permanently attached to the right side of the pack, just above the pocket for a water bottle. Mine has no such strap. Images of the Axis backpacks on the Tenba web site also lack this strap. I do not know the reason for this difference. The whole cloth of the pack is rubberized on its external surface. This looks more water-repellent and more expensive than the woven nylon cloth typical of all-weather Lowepro packs. At the same time, an external waterproofing layer may wear out more easily than an internal one. This is why military and good civilian raincoats are internally waterproofed. An external wettable layer of cloth (e.g. cotton) spreads a few drops of water to a wider surface, which enhances evaporation. On a rubberized surface, water droplets that do not run off take longer to evaporate, and may potentially collect along stitches and zippers. On the other hand, a soaked wet cloth surface does take longer than a rubberized surface to dry. A cloth surface is also easily soiled with mud and requires a thorough washing to clean, while a rubberized surface can be wiped clean with wet kitchen paper. I don't know whether the Lowepro ProTactic series uses a better-looking material than the rough-to-the-touch recycled-plastic textile of my old Lowepro Primus All-Weather. I do hope so. The Tenba Axis 25 L uses internal partitions of two different types. The larger partitions are thick and relatively stiff, and covered with a spongy cloth that attaches to Velcro loops. The smaller partitions are only half as thick and covered in thin, smooth synthetic cloth. The lining of the pack's main compartment is similar to the large partitions, and integral with the outer shell of the pack (in other words, the padded interior cannot be extracted as a single piece from the pack). Harness adjustmentsEach shoulder strap can be adjusted at both ends. A plastic card is used to separate the Velcro lining the shoulder strap at its top end from the backpack. The strap can then be slid to a new position, and fastened by extracting the card and pressing the sleeve of the strap in the corresponding area. The card is fastened to the backpack with a string, and stored in a pocket on the back of the pack. This allows the height of the backpack on your back to be adjusted, to best fit your body size and posture. Since I am not a big guy but relatively big-chested, the position marked with two dots best fits my body frame. The three-dot position fits a really big guy. The one-dot position should fit most ladies. Still, the 25 L model looks exaggerately big on my wife, who is a slender Asian. The 20 L model would be a better fit for her body frame, but probably would still look big on her. An adjustable tension strap also joins the top of each shoulder strap to the backpack via a plastic clasp. Each shoulder strap can be adjusted in length near its bottom with a plastic clasp. To completely separate a shoulder strap from the pack, you need to open all three fasteners. After removing the shoulder straps, two narrow but rather long straps remain attached to the bottom of the main hatch. The hip belt can be separated from the pack by inserting a hand in the sleeve surrounding the belt on the back of the pack, and separating the two Velcro surfaces before extracting the belt sideways. The separated hip belt can be used as a utility belt, with a couple of lens bags attached to its PALS loops. The belt can also be worn separately on one's waist when entering a plane (e.g. under a jacket), to reduce the size of the backpack and the number of loose straps, and make its handling easier. Possible weak points?An unusual characteristic of the Tenba Axis series is that all harness points, including even the carying loop, are attached to the back access hatch. In turn, this means that the zipper closing this hatch carries the whole weight of the pack all the time. If this zipper should suddenly fail while wearing the backpack, there is nothing else to keep the camera compartment from opening and spilling out its contents. This is perhaps why other backpacks with straps attached to the main hatch, like the Wisport Caracal, have additional clasps to keep the backpack closed. I have never had a backpack zipper fail in this way, but I will try to remember to inspect the zipper before every outing. The zipper of the main hatch is much stronger than those on the other hatches, so it appears that Tenba is aware of the potential problem and has addressed it. On the other hand, placing all harness attachments on the back hatch means that, once this hatch is open, no straps are in one's way while accessing the equipment. This is a significant advantage, compared to the traditional solution (used e.g. in the Lowepro ProTactic series) of attaching the shoulder straps to the top and bottom of the pack body. It is also remarkable that the top of the shoulder straps is kept in place by Velcro. In this case, however, there is an additional, more conventionally implemented tie point nearby. Should the Velcro come loose, the shoulder strap will not separate from the pack. The Velcro seems to work, though, and I cannot pull a shoulder strap loose from its sleeve no matter how hard I try. The only way is to use the supplied plastic card. Main hatchThe hatch on the back gives access to the whole camera compartment. In theory at least, the main hatch can be opened after removing the shoulder straps from one's shoulders and rotating the pack to the front around the hip belt. However, this is hard work with a full pack and a tight hip belt. In practice, the backpack is most often laid on the ground when using this hatch. The safest way is by putting down the pack with its rear against the ground. If you need to access something that you know is in the upper half of the compartment, you can alternatively put down the pack on its bottom and open the hatch zippers only halfway. Additional hatchesIn addition to the large main hatch on the back, there is a camera access hatch at the top of the pack and a second one on the left side of the pack, so you can choose which quick-access hatch best fits your working style, or store one ready-to-use camera behind each hatch. Depending on how the insert partitions are configured, both cameras can be attached to a rather long lens. Both hatches are generously sized and you should never find them too small (or wrongly shaped like the side hatch on my old Lowepro Primus AW) to allow a camera to be easily extracted. I have a personal experience of a Lowepro backpack where the side hatch makes it nearly impossible to extract a Micro 4/3 body without additional battery grip. Two blue tabs visible after opening the top hatch can be pulled to release Velcro-fastened dividers. They give access to the two storage spaces on either side of the central camera + lens compartment through the top hatch, without a need to open the main hatch. In this way, the top hatch gives access in total to a camera body and three lenses. The large size of this hatch reflects this additional function. The left-side hatch is covered in PALS loops, but not the top hatch. Additional pocketsA non-padded pocket on the right side of the pack fits a water bottle. The top of this pocket is kept closed by a non-removable elastic ribbon. A small eyelet near the bottom of the pocket allows any water spills to drip out of the pocket. The large pocket at the rear of the pack has multiple sleeves for pens, notepads, memory bank etc. A zippered internal pocket is present under the door of the top hatch. A large padded pocket on the inside of the main hatch accepts a laptop (of different maximum size in the different pack sizes). A short zipper partly hidden under the bottom of the rear pocket opens to extract a non-padded sleeve that can hold one or two feet of a tripod attached vertically on the loops covering the back pocket. PALS webbingsThe PALS webbings on the rear pocket and right side hatch are vertically 25 mm wide and spaced 25 mm from each other. This exactly complies with PALS specifications. The stitchings along a ribbon are horizontally spaced 40 mm (on the side hatch) or 42 mm (on the rear panel). This is slightly more than the 38 mm PALS specification, but still close enough to be fully PALS-compatible. The stitchings near the sides of the two panels are much more closely spaced together. They do not follow the PALS specification, but can be used for carabiners or other narrow fittings, and allow the use of the edges of the panels, which would otherwise be wasted. The Axis 24 L comes with two compression straps that can be fitted to these non-standard slots of the panel (they can however be moved to standard-width slots if desired), and can be used to attach a tripod vertically on the rear pocket. Each side of the hip belt has a single PALS-like slot, but the ribbon is 38 mm wide instead of the standard 25 mm, and the side stitchings are 60 mm apart. This is enough to accept ordinary lens pouches like those by Lowepro, JJC and other brands. I sometimes find it useful to have a lens stored in a lens pouch attached to the belt, since this means I can swap lenses without having to remove and open the backpack. Each shoulder strap has two loops of thin non-elastic ribbon. The uppermost one is high up on the shoulder and, in my opinion, not in a position useful as a carry attachment. The lowermost loop, about 50 mm wide, can be used to attach a small bag or lens pouch. In my experience, it is a better idea to attach a Tenba lens pouch, even of the smallest size, to the waist belt of the backpack rather than on a shoulder strap. A Tenba battery pouch or memory card wallet, on the other hand, fits just fine on the lowermost loop on a shoulder strap. SummaryWell-designed tactical-style camera backpacks with a main hatch against the body of the wearer are currently available from Tenba and Lowepro. Each of the two brands settled on a different design, with both advantages and disadvantages. Choosing one of these designs is not simple. In addition, counterfeit Lowepro backpacks are common, which makes getting a genuine item by mail order uncertain. In my case, I chose the Tenba Axis 24 L, because of multiple considerations. Only time will tell if the Tenba design with all harness attached to the door of the main hatch is as durable as the more conventional Lowepro design with harness attached to the body of the backpack. |