How to specify the reproduction ratioA lens used at the reproduction ratio of 1:1 on a full frame sensor produces the image of a subject 24 by 36 mm across. The same lens, used at the same reproduction ratio of 1:1 on a current APS-C format sensor, and fills this sensor with a subject that is approximately 18 by 24 mm across. Therefore, the size of the subject at a given magnification depends on the size of the film or sensor. 

A reproduction ratio based on the subject and film/sensor size has nothing to do with the physical size of a printed photograph. The same negative shot at 1:1 can be printed on paper the size of a postage stamp, or a poster. The picture was originally shot at 1:1, but knowing this does not help us to get an idea of the size of the subject from a print. Therefore, when we are dealing with printed photographs on paper, it does make sense to provide a magnification ratio relative to the size of the print. If you want to do this, you multiply the magnification ratio used when shooting by the one used in printing. It is not possible to specify a reproduction ratio that applies to a photograph published in digital format (e.g., on a web site), because the physical size at which a digital photograph is viewed cannot be known in advance. In this case, frequently one specifies the magnification used when shooting. Unless the film or sensor size is known, however, it is not possible to compute the size of the subject from the original magnification of a digital image. If the size of the subject is important, its physical size should be documented, in one of the ways suggested below. Documenting the reproduction ratioIn many digital cameras, the reproduction ratio is not stored with other image data, and the focusing distance of the lens may be recorded as a very approximate value, or not at all. Therefore, a notebook, palm computer, voice recorder or other method of keeping annotations is usually a necessary documentation tool in close-up and macro photography.Usually, a photographer will record the reproduction ratio as shown on the lens barrel, which in many cases is adequate to provide an approximate value. If the exact size of a subject is important, however, the subject itself should be measured, and its size written down. Unless you know from previous experience that the reproduction ratio as indicated on the lens barrel is adequate, you should measure the subject whenever you know in advance that its size will be specified when publishing a photograph. This is especially important for museum specimens, art, historical and forensic artefacts, and in all other situations in which the size of a specific object must be documented. This can be done by measuring its height or length (if what is called height or length is immediately obvious from the photograph), or by specifying the size of a detail that can be immediately identified (e.g., in a landscape, the height of a clearly identified lamp post or building). If a photograph has a very high depth of field and its subject is a three-dimensional object with a conspicuous depth, it may not be possible to exactly specify a reproduction ratio for the whole photograph. Objects that lie in front of or behind the plane of focus are rendered at different apparent sizes because of perspective effects. In such a case, the physical dimension of the subject should be documented instead. When the camera is focused at infinity, it is of course meaningless to specify a reproduction ratio, and the physical size of the subject should be used in this case. When photographing geological subjects, it is customary to place a geologist's hammer well visible in the photograph. This hammer provides a good idea of the scale of the subject. Geologists usually carry a hammer, and its size is fairly constant. Better yet, a ruler can be used. If you know in advance that you will be required to document the size of subjects, carry an adequate ruler in your camera bag. An adequate ruler has divisions that are clearly marked (usually in black-on-white) and easily visible even when moderately out of focus.  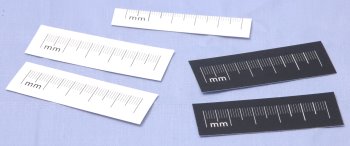
These are examples of rulers I have used. You can make your own with your choice of graphic software, print them out and laminate them for use in wet conditions if necessary (but be careful to avoid reflections if you laminate them - plain typing paper or cardboard gives the best visibility). These rulers provide a professional look to your picture, give precise size information, cost virtually nothing to make, and take practically no space to carry in a camera bag. I have seen many field photographs in which a 35 mm film canister was used as a scale. Now that film is dying out, you cannot count on having one at hand, and within a generation almost no one will have an idea of its actual size. I have also seen lens caps used as a scale, which is utter nonsense. My cameras and lenses use lens caps ranging from 29 to 110 mm in diameter, and smaller as well as larger ones do exist. It is anybody's guess what particular size of cap was used in a photograph. With a ruler, you can be assured that centimetres will remain the same in the foreseeable future. |