IR photographyThe infrared range begins at wavelengths of 700 nm (at the red end of the visible spectrum) and extends toward longer wavelengths. Both sunlight and incandescent light sources contain large amounts of infrared. The sensors used in digital cameras are very sensitive to near-infrared (700-1200 nm). Virtually all digital cameras use infrared-cut filters sandwiched on top of the sensor, in order to reduce or eliminate IR light. Many of these filters let usable amounts of IR pass (up to about 900 nm), and these cameras can be used for IR photography (if you can live with exposure times of the order of up to several seconds). The built-in IR-cut filters are of varying construction and effectiveness, which makes different camera brands and models more or less suitable for IR photography. Among Nikon DSLRs, the D70 and D70s are reported to be particularly suitable for IR photography. Thermal imaging uses much longer wavelengths, and digital cameras cannot be used for this application. The best results in IR photography are obtained in two different ways. One is by using an IR-pass filter in front of the lens. This blocks shorter wavelengths, so that they do not contribute to pictures. The filter must be moved out of the way when framing and focusing. The other way is by removing the built-in IR-cut filter (in practice, the built-in filter must be replaced with a transparent window of the same thickness, or focusing will be off). A camera modified in this way becomes essentially useless for general-purpose photography, but you can place an IR-cut filter in front of the lens and recover part of the original performance (albeit colour balance is likely to be off, because it is usually impossible to match exactly the spectral properties of built-in filters. Removing the built-in IR-cut filter usually removes also the anti-aliasing filter, so you should expect a far greater occurrence of aliasing artefacts (you cannot place an anti-aliasing filter in front of the lens). On the other hand, the resolution of fine detail is increased by removing the anti-aliasing filter. It is possible to use an IR-pass filter also with a modified camera, if you want to record only IR light. 
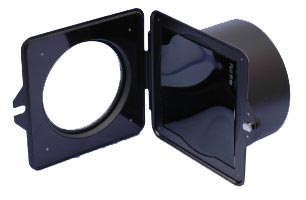
Several glass and plastic IR-pass filters are available. I obtain good results with a Fuji IR 82. The above picture shows this filter (75 mm square) mounted in a Nikon AF-2 gelatin filter holder. I keep the filter semi-permanently mounted in the holder with bi-adhesive tape on its corners. The filter holder swings open, thus allowing framing and focusing. This holder has a 72 mm male filter thread for connecting to the filter thread of a lens (usually via an adapter ring). This mount rotates freely, so you can turn the holder around to make it swing open in a suitable direction. The holder also has an 82 mm female filter thread at its front, which fits the special lens shade shown above (marked only "for AF-2", apparently made by Nikon), or another one suitable to the lens you must use. The AF-2 is a lightweight but precision-built metal (non-aluminium) construction. It originally came with a thin internal foam padding in the swinging portion, which I removed to fasten the filter. This holder cannot house thick glass or plastic (Cokin-type) square filters. Most lenses exhibit a considerable amount of focus shift in the near-IR, i.e., they focus visible and IR light at different focal planes. Older lenses have a red dot or a comparable indicator on their depth-of-field scale. This indicator provides the approximate amount of shift of the focusing ring to correct for IR focus shift. If the lens you intend to use for IR photography does not have a focus shift indicator, or if you desire a better accuracy, you must find out the correct amount of focus shift by trial and error. In most lenses, the indicator of focus shift is only approximate, and the amount of focus shift may change at different focal lengths and focusing distances. 
Several web sites deal with the technique and artistic characteristics of near-IR photography, so I will not concentrate on these aspects. The above and following examples show my results with the Fuji IR 82 filter and D70s. The above example was post-processed in Photoshop by using different response curves in different component colours, thus creating the impression of colour in the final result (but the original picture is essentially monochromatic, so the process is rather a type of toning). 
The second example combines visible and IR images taken in succession. The IR component contributes to eliminate haze and to increase the overall clarity and contrast of the picture. In the sky in the above picture, the image in the visible range is completely featureless, while the IR image clearly shows the cloud structure. Using an IR-pass filter is not the only way to take pictures in the IR range. Most UV-pass filters also transmit in the infrared, and can be used for the latter purpose in addition to UV photography. This is feasible if you already own a UV-pass filter, but these filters are more expensive than IR-pass filters. An additional method is by using two stacked polarisers, as discussed below. Polarising filters transmit light polarised along one plane, and absorb light polarised along a second plane perpendicular to this. In practice, transmission or absorption along these planes range continuously between a maximum and a minimum value rather far from complete transmission or absorption. Two types of polarisers are commonly used for photographic purposes. So-caller linear polarisers consist of a plastic polarising film sandwiched between glass plates. So-called circular polarisers add a quarter-wave retarding plate at the back of the polarising film. DSLRs require the use of circular polarisers in order to meter correctly. 
The setup discussed here (above picture) consists of a linear polariser stacked on top of a circular polariser. A lens shade is also seen in the above picture. The circular polariser must be placed closest to the camera lens. When the linear polariser is rotated and the circular one remains fixed, light transmission of the stacked filters range from opacity to relative transparency. Each turn of one polarizer runs through two peaks of transparency and two of opacity. In practice, the stack transmits light when the axes of the polarisers are parallel, and extinguishes it when they are perpendicular to each other. The reason why the outer polarizer must be linear is that circular polarisers rotate the polarisation plane of transmitted light (thus, in effects, making it non-polarised). The inner polariser must be of the circular type to allow metering. If you expose manually, also the inner polariser can be linear (which is slightly cheaper). My tests show that crossed polarisers of the types used in photography effectively block most visible light (except a very dark, deep purple tinge), but still transmit near-IR. Thus, they can be used as an IR-pass filter. There are a few advantages to crossed polarisers in place of an IR-pass filter. The first is that polarisers only need to turn, instead of swinging out like a filter mount (or being unscrewed like a mounted circular filter). This is especially useful in close-up and macro photography, in which the working distance from the subject may be too small to make either swinging or unscrewing practical. A second advantage is that extinction of the polarisers is gradual, which allows variable amounts of visible and IR to be combined together in the same exposure. A further advantage is that, in most cases, you can continue to use the normal lens shade of the lens you are using, instead of needing a special one for a filter holder. An unexpected problem I encountered in IR macro photography is that the flexible material of some bellows transmits enough IR to completely fog the picture, if a narrow lens aperture is used. You need to test your bellows to see if they suffer from this problem. |