Godox XPro O and XPro II O remote flash controllersOn a different page, I discussed my experience with Godox remote flash controllers of the X1 series, and the XPro S controller. Briefly, the X1 series was a disappointment, with unreliable connection to Godox AD200 flash units and frequent misfiring, severe problems with the firmware update procedure, and a host of other problems. When Godox introduced the XPro series, I tested the XPro S for Sony mirrorless, and found it to be reliable and problem-free. I then purchased an XPro O for my Olympus E-M1, E-M1 II and OM System OM-1, and found it equally reliable. As a result, I ditched each and every one of my several X1 devices, and continued to use only my XPro. My poor experience with the X1 controllers was far from unusual, judging from the many negative reviews, and Godox did well to eventually replace the X1 series with a much improved X2 series. The XPro series, on the other hand, was good and reliable already at the start, and Godox continued to produce it until about a year ago. It then gradually introduced an updated, slightly larger XPro II series one model at a time. This series is largely similar to the original XPro, and one of the reasons for the present page is to find out whether the XPro II O (for Olympus, OM System and Panasonic Micro 4/3) performs better than the original XPro O in some respect. Quite possibly, the XPro models already are out of production although not officially discontinued, and the old stocks will continue to be sold only until exhausted. Therefore, soon you will not have a purchase choice between these two series. Your main choice will be between the smaller and cheaper X2 series and the more capable (and equipped with larger screen and more numerous hardware controls) XPro II series. As for myself, after being burned with the X1 series, I decided to pass on the X2 series and to stay with the XPro/XPro II in spite of their higher size, weight and price. The X2 series might be interesting if you need to attach an additional device (e.g. a microphone or speedlight) on top of the X2 controller. The XPro/XPro II series has no hot shoe on top. Godox recently introduced the X3 series of miniaturized flash controllers with a small touch screen. I have no experience with this series, but I would not recommend it at present. Perhaps I will change my opinion if the reviews of this new controller series will be overwhelmingly positive, but not before. For now, I remain of the opinion that the minuscule swipe-and-tap touch screen does not inspire a feeling of ergonomic efficiency, and that the small size of the built-in USB-rechargeable battery is a further potential concern for long work sessions. The size-advantage of this small flash controller is limited when you are carrying along large and heavy studio strobes, and disappears if you have to carry along also a USB power bank and must wait a considerable time while recharging the controller in the field. The X2 and XPro series only need two spare AA batteries, either rechargeable or disposable, that take only seconds to swap. Although the XPro and XPro II series work well also with rechargeable AA batteries, their battery indicator is calibrated for disposable batteries, and may incorrectly display a low-battery warning with rechargeable AAs. You should also be aware that Adorama is selling a series of Flashpoint branded, slightly cheaper strobe controllers, quite similar to the Godox XPro/XPro II series in external appearance but providing a different set of firmware functions. These controllers are not made by Godox, are not branded Godox, and if any compatibility problem arises, you should not expect Godox to support the operation of their strobes with these third-party controllers. Comparison of hardware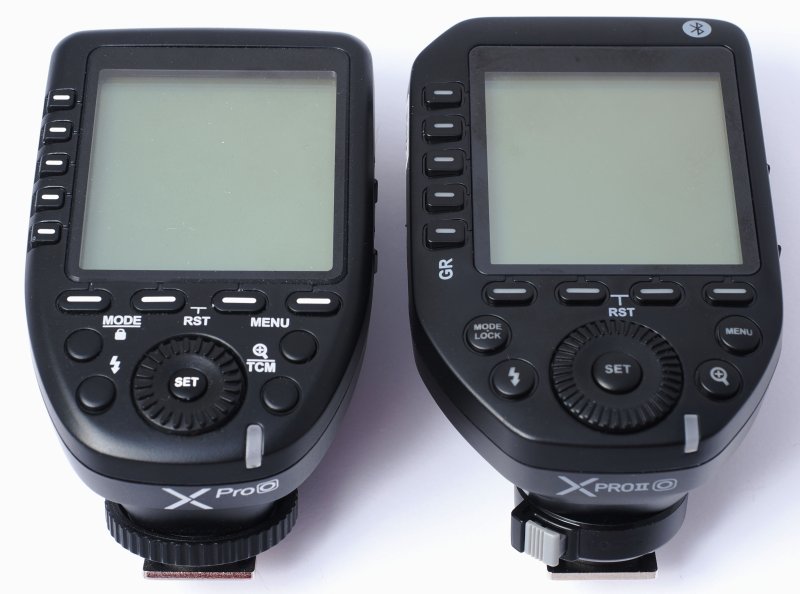
The XPro II O is slightly larger (91 mm high by 61 mm wide, vs. 88 mm high by 57 mm wide) and heavier (140 g vs. 135 g) than the original XPro O. Perhaps the most noticeable difference is the locking mechanism that prevents the controller from accidentally sliding off the hot shoe of the camera. The original model has a threaded collar that screws down against the hot shoe and presses against the latter, in addition to a protruding pin that fits into the hot shoe. When properly tightened, this mechanism prevents all movements of the controller. A possible drawback is that it is possible to overtighten this collar, making it excessively hard to unlock afterwards and placing a mechanical stress on the hot shoe. The new model has a button-unlocked collar that only turns one-quarter of a turn and locks automatically. The locking direction is the opposite of the old model (clockwise for the XPro O, counter-clockwise for the XPro II O), so it takes some getting used to. Worst comes to worst, you may damage the hot shoe of the camera and/or the controller by forcing a locked controller onto or off the hot shoe. While the buttons and front panel of the XPro II O are slightly larger than those of the original model, the number, positions and labels of the controls are the same:
On the left side of the housing of the XPro O are a USB3 socket (for firmware updates) and a 3.5 mm jack (for non-TTL flash triggering), covered by a rubber flap. The rubber flap is gone on the XPro II O. At the front of the base, near the hot shoe, is a transparent window for the Focus Assist LED. This red LED projects a dot pattern onto the subject, which can be picked up by the camera and used to autofocus, even in the lack of sharp topographic features on the subject. This LED may be blocked by an unusually large lens or lens shade. In both models, a lanyard can be attached at the top left corner of the housing. LCD backlightIn summary mode, the rightmost of the buttons aligned under the LCD screen turns on the LCD backlight, improving the visibility of the screen in low light. There seems to be no way to turn off the backlight, other than switching the controller off and then back on, or waiting until the controller goes to sleep. Battery compartmentThe door of the battery compartment is located on the undersurface of the housing. In the XPro II O, the door is wider and the two AA batteries are spaced further away from each other, and slightly easier to extract. The battery compartment is more cramped in the original model, with no obvious way to get a handgrip on the batteries. Fully charged rechargeable AA batteries do work, but both controllers stop working long before these batteries are fully exhausted. Cheap alkaline batteries last far longer. Sleep mode and battery lifeBoth controllers switch off the LCD screen after a minute or so of inactivity, but continue to draw a little power. If you forget to switch off the controllers with their power switch, after 2-3 weeks their batteries can be totally discharged in spite of the controllers entering sleep mode. BluetoothNear the top right corner of the XPro II O is a Bluetooth icon, absent in the original model. Godox says that this model can be controlled via a mobile phone app. No such functionality is available in the original model. This is the only significant functional difference I have discovered so far between the two models. The UI of the two models slightly differs in appearance, but I am not aware of other significant functional differences. I have been able to find on the XPro II O all the firmware functions that I am used to on the original XPro O. My relatively old Android phone was unable to run the Godox app (it installs successfully but hangs while starting), so this functionality does not work for me. Firmware upgradesGodox says that the firmware of the XPro O and XPro II O can be updated on a Windows PC by downloading the latest firmware image and installing an updating app from Godox.
On my Windows 11 PC and Windows 10 laptop (both updated to current Windows versions), the Godox app for
upgrading the firmware fails to detect the presence of both the XPro O and XPro II O, so I am unable to
update the firmware. This app used to work when I last used it a few years ago with older Godox equipment,
but Godox has failed to keep it updated for subsequent Windows upgrades and the app is now non-functional.
Running the app in compatibility mode for an earlier Windows version does not help. Basic configurationIn a typical use case, you need to configure the XPro II O to match the configuration of a remotely controlled studio strobe. In the following example, I assume that the strobe is already configured as:
See the documentation of the strobe for instruction on how to configure it. If no group was previously configured on the remote, it is reasonable to choose Group A for this task. Only Group A, Group B and Group C can be set to TTL operating mode. The remaining groups can only be set to M (Manual) or OFF (displayed as --). As a factory default, the controller is set to Channel 21. To change it to Channel 1:
You may wish to verify that ID is off on the controller:
You should also check that the controller is set to the proper distance setting from the strobe(s):
Now you need to set Group A to TTL mode and set the exposure correction factor to 0.0:
If you will only use Group A, verify that the remaining groups are off (--). Turn on the strobe and press the Test button (lightning bolt icon) on the controller. The strobe should flash at low power. If the configuration works as expected and there is no apparent interference from other radio source, you may wish to lock the configuration against accidental changes:
You can suspect interference, for example, if the strobe randomly fires even though it has not been triggered by the XPro II O, or if the strobe sometimes misfires or fails to fire when triggered by the controller. Misfires usually result in a strongly under- or overexposed image, or a completely black frame. Configuring the same ID on the controller and strobe in some cases may help to prevent interference. Additional controls and labelsThe button with the magnifying glass icon, described as Magnification Function in the XPro II O user guide, switches from a summary view of the first five Groups to a detailed one-group view of the currently selected group. However, the displayed information (Group, Mode, exposure factor, modeling light intensity in %) seems to be the same in both display modes. There are slight differences in which settings can be selected and changed (with the row of unlabeled buttons at the bottom of the screen) in either view. The TCM label that accompanies the Magnification Function button in the XPro O is gone in the XPro II O. The TCM function is supposed to allow switching between TTL and M modes without losing the settings of either mode, although I am not quite clear on how it actually works. TCM can be switched off, or on at a number of different powers (in Joule), or to a special setting for a specific Godox speedlight series. The user guide contains a table of values in J corresponding to the major studio strobe models/families. For example, 600 J is the setting indicated for the AD600 family. I leave TCM OFF, which does not seem to have any negative effect with my strobes. When the TTL mode seems to over- or underexpose with some subjects, I prefer to use the exposure compensation instead of switching to M mode. The Zoom setting applies only to speedlights. I leave it on Auto, where it seems to have no effect when used with strobes. The labels of the buttons and controls of the XPro O are screen-printed on the front panel in white-on-black, and very visible. The labels on the XPro II O appear to be laser-burned and are gray-on-black, and therefore much less visible in low light. They look sharper than screen-printed labels. So far, neither type of labels seems bo be wearing off in my controllers. Labels located on top of the buttons should be more likely to wear out than those located on the casing. Should you upgrade from an earlier controller to the XPro II?If you are still using an original X1T controller and are experiencing problems with it, upgrading to the XPro II makes perfect sense. My X1T O still works fine (although its range is not as wide as the XPro O), while my XT1 S (for Sony Alpha) never worked properly, and I ditched it together with other controllers and receivers for Sony from the original Godox series. None of these early-model devices for Sony cameras worked properly, and about half of them never worked at all (but my XPro S does work on the Sony A7II and A7RII). I have no hands-on experience with the X2T controller series, which replaced the X1T series and kept the same size as the X1T, but added several hardware controls and a locking collar similar to the XPro II. Given my largely negative experience with the X1T, I upgraded directly to the more promising XPro series for both my Olympus and Sony cameras. If you are using an XPro controller, the only good reason for upgrading to the XPro II is the Bluetooth functionality (assuming that you will be able to use it - I did not succeed on my Android phone). If you don't need to use the controller via Bluetooth on a mobile phone, I don't see any reason to upgrade to the XPro II. If you are considering the purchase of a new XPro II controller because you need one more controller, then you don't really have a choice, because the XPro series has been discontinued, or will be discontinued soon. SummaryThe Godox XPro II O radio strobe controller works as well as the older XPro O. The newer model adds Bluetooth functionality, and replaces the locking collar with a different design, but does not seem to add any other new function. If there are improvements in the functionality, I have not discovered them. Since the older XPro O has been discontinued, new buyers of the Godox strobe radio control system don't really have a choice. With the potential exception of the Bluetooth functionality, I cannot see any reason for anyone to replace their XPro with the newer and more expensive XPro II. The Godox Bluetooth remote control app for the XPro II does not work on my Android phone. The Godox firmware update software does not work with the XPro and XPro II on my Windows 10 and Windows 11 PCs (nor does it work with my Godox AD600 Pro strobe). |